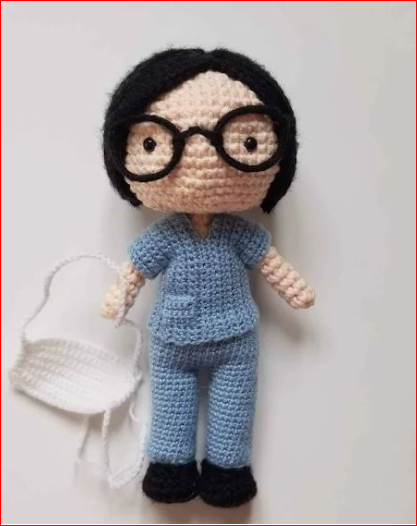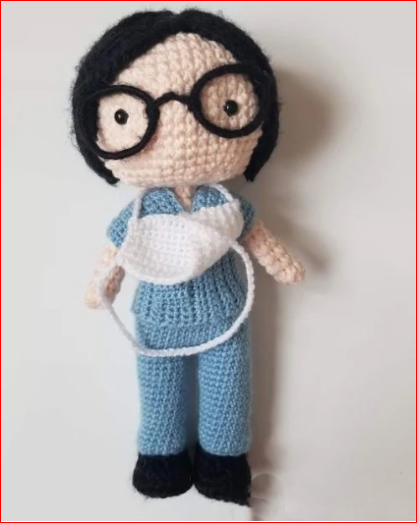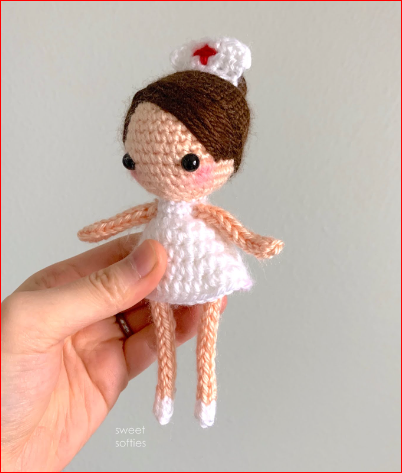

Hello Amigurumi followers, I wanted to share free amigurumi models with you on my Amigurumi mobi page. In my article, I share the Nurse Toy Amigurumi Free Crochet Pattern for you. In the article on my page, I give detailed information about the Amigurumi pattern;Nurse Toy Amigurumi Free Crochet Pattern.
Materials
Mini Mimi Doll
Superfine (Weight 1) Yarn
Main Colour (I used Loops & Threads Woolike in Ice Blue and
White)
2.5 mm Crochet Hook
Worsted Yarn in Black (for the shoes)
3.0 mm Crochet Hook (for the shoes)
1-2 sets of
Stitches & Abbreviations
ch – chain
st/sts – stitch/stitches
sc – single crochet
sc inc – single crochet increase
sc3tog – single crochet 3 stitches together
BLO – back loop only
Notes
This crochet pattern is just for the scrubs outfit, shoes, and mask.
To find the crochet pattern for the doll, please visit this blog post
and its links: Mini Mimi CAL.
If you are looking to purchase the ad-free PDF version of the Mini
Mimi amigurumi doll, you can visit my Ravelry store.
After the foundation chain, I decided to work my single crochets on
the back bumps of the chain because it creates a nicer finish to the
piece.
The seams on the sides sit more toward the front of the scrubs.
Scrub Top
Using a 2.5 mm crochet hook with superfine yarn in blue…
Ch 41
Row 1: Sc into (the bump on the back of) the second ch from the hook
and in each st across (40 sts)
Row 2- 8: Ch 1, turn, sc into each st across (40 sts)
Row 9: Ch 1, turn, sc into each st across for the next 12 sts, leave the
rest of the sts unworked (12 sts)
Row 10-12: Ch 1, turn, sc into each st across (12 sts) [pic 1]
Row 13: Ch 1, turn, and fold the piece in half lengthwise (the right
side facing each other) [pic 2]. Aligning the 2 sides, work 12 slst to join
the front and the back panels together. (12 sts) [pic 3 and 4]
Then, we are going to work on the sleeves:
Row 14: Ch 1, work 18 sc around the armhole you just created (18
sts) [pic 5 and 6]
Row 15-16: Ch 1, turn, sc in each st across the sleeve (18 sts)
Cut, fasten off, and use the tail to seam up the sleeves.
At this point, you’ve only made half a shirt. To make the other half,
start from the bottom front of the shirt. So turn it over so you have the
RS towards you. The seam you created from slip stitching the front and
back panels should sit more towards the front of the scrub top [pic 7]
Row 1: Join with a standing sc [pic 8 and 9] and then sc into the next
14 sts, then ch 26 (41 sts)
Row 2-9: Ch 1, turn, sc into (the back bump of the back of) the
second ch from the hook and in each st across (40 sts)
Row 10: Ch 1, turn, sc into each st across for the next 12 sts, leave
the rest of the sts unworked (12 sts)
Row 11-13: Ch 1, turn, sc into each st across (12 sts) [pic 10]
Row 14: Ch 1, turn, again, fold the piece in half lengthwise (the RS
facing each other and the WS facing you – [pic 11]). Aligning the 2
sides, work 12 slst to join the front and back panels together (12 sts)
Row 15: Ch 1, work 18 sc around the armhole you created (18 sts)
[pic 12]
Row 16-17: Ch 1, turn, sc in each st across (18 sts)
Cut, fasten off, and use the tail to seam up the sleeves.
Using superfine yarn in blue with a 2.5 mm crochet hook…
Ch 6
Row 1: Sc into the second ch from the hook, and then sc in every st
across (5 sts)
Row 2-5: Ch 1, turn, sc in every st across (5 sts)
Cut and fasten off, then use the remaining yarn ends to sew it onto the
front left side of the scrub top
To fasten up the shirt in the back, I used a small hook and eye fastener
(similar to those you’d find on bras). If you have little snap buttons for
doll clothes, you can try those instead.
Scrub Pants
Using superfine yarn in blue with a 2.5 mm crochet hook…
Ch 21,
Round 1: Sc into (the bump on the back of) the first st of the
foundation ch (working along the back bumps on the foundation chain
makes for a nicer finish at the cuffs of the pant legs) making a loop and
in every st around (20 sts)
Rounds 2-18: Sc in each st around (20 sts)
Cut and fasten off.
Make a second pant leg, but don’t cut and fasten off.
Round 19: Sc around the first pant leg, then sc around your second
pant leg that you just created (40 sts)
Round 20-30: Sc in each st around (40 sts)
Cut, fasten off, and weave in your ends!
I had a small piece of white yarn from making the mask so I used that
to add a little drawstring.
Mask
Using superfine yarn in white with a 2.5 mm crochet hook…
Ch 21
Row 1: Sc into the second ch from the hook and in each st across (20
sts)
Row 2-12: Ch 1, turn, sc in each st across (20 sts)
Before you cut and fasten off, make ch long enough to go around your
Mini Mimi’s head and join it to the other side of the mask.
Join your yarn to each of the bottom 2 corners of the mask and ch 25
or long enough to tie behind Mini Mimi’s neck.
Using the stray strands of yarn, weave up the sides of the mask,
tighten and scrunch it up slightly to create more of a mask shape, and
then secure in the ends.
Shose
Using worsted weight yarn in black with a 3.0 mm crochet hook…
Round 1: Magic Ring with a base of 6 sc (6 sts)
Round 2: Sc inc in each st around (12 sts)
Round 3: [Sc, sc inc] x 6 times (18 sts)
Round 4: Sc BLO in each st around (18 sts)
Round 5: Sc in each st around (18 sts)
Round 6: 6 sc, [sc3tog] x 2 times, 6 sc (14 sts)
Cut and fasten off.
All Finished.