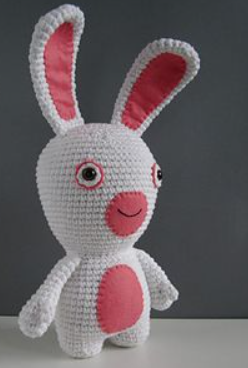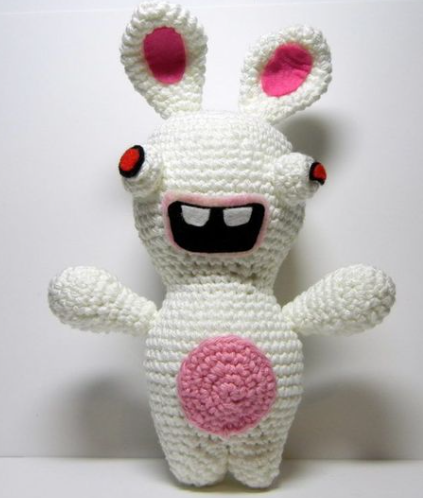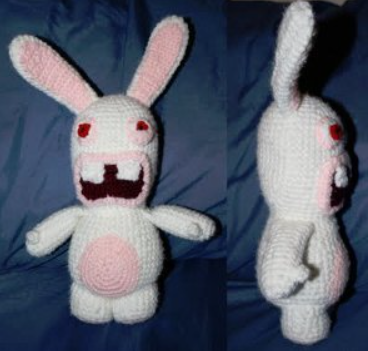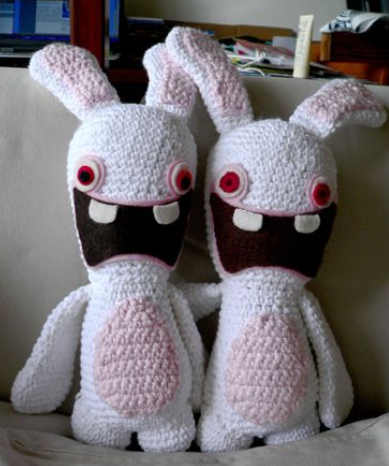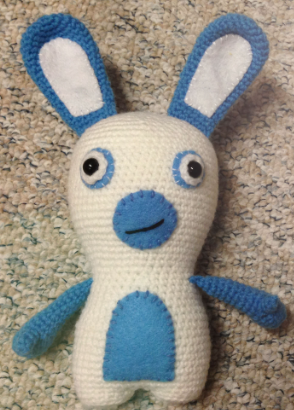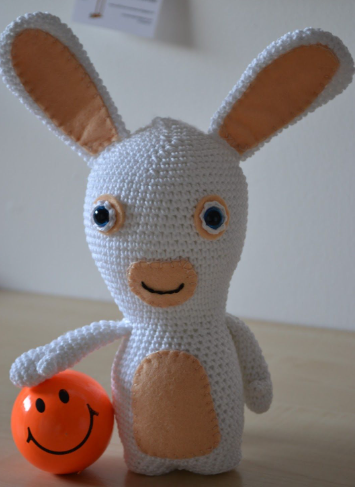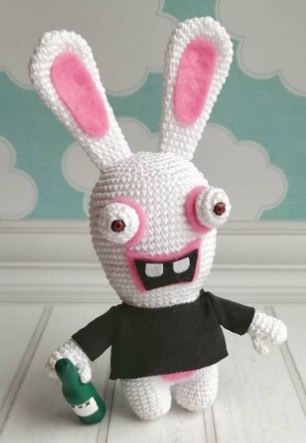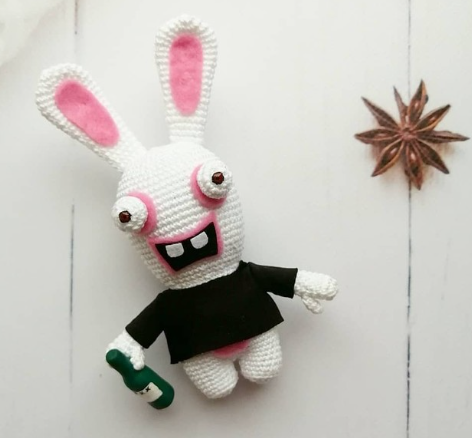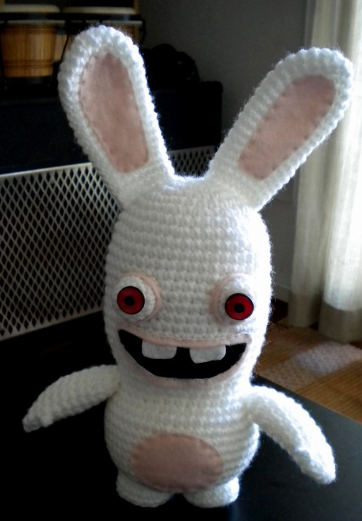

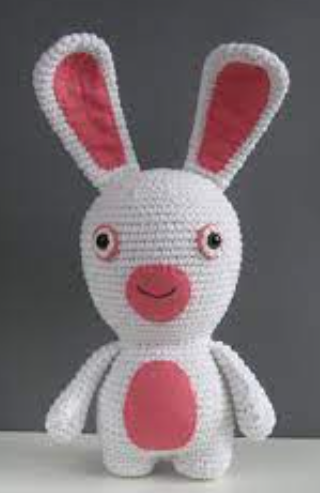
Hello Amigurumi followers, I wanted to share free amigurumi models with you on my Amigurumi mobi page. In my article, I share the Raiman’s Mad Rabbits Amigurumi Pattern for you. In the article on my page, I give detailed information about the Amigurumi pattern; Raiman’s Mad Rabbits Amigurumi Pattern.
You will need:
- yarn of medium yarn ( 4 Medium ), a mixture of cotton and acrylic 92 m / 50 g, you will need about 80 g or 150 m of yarn;
- a hook of 3.5 mm or suitable in size to your yarn;
- — polyester, wool, cotton wool, etc.;
- safe eyes for toys 12-15 mm;
- sheet felt and suitable threads;
- a needle with a large ear, a needle for sewing, scissors, a marker loops.
Abbreviations:
vp = air loop
SBN = pillar without cape
— increase 2 columns without cape in the same loop
decrease — tie 2 columns without cape together
( SBN 2, increase ) x n = repeat the loops in parentheses n-quantity times
( 24 ) = number of loops in a circular row after its end
Pay attention
Do not close the rows, knit on a continuous spiral.
Use a baker for loops or a slice of yarn to indicate the end or beginning of a row. Move the marker as each row ends.
All loops fit into both walls, unless otherwise indicated in the diagram.
Body
Legs, body and head fit together, starting from below. Start by knitting a small triangle, which will then be sewn between your legs.
Row 1: 3 vp, 2 SBN ( starting with the second loop from the hook )
Cut the yarn, leaving a long tail for sewing. Stretch the end of the thread through the loop. Lock in the first loop of the chain to make a circle. Later, a column without nakida will be tied into it.
1. Cut the yarn, leaving a long ponytail. Insert the ponytail into the needle with a large ear.
2. Carry the needle through the first air loop. Pull out the thread.
3. Carry the needle through the last loop below and between two loops.
4. Pull over until the loop is as large as the rest.
Feet
Tie 2 legs. Do not cut the thread at the second leg.
Row 1: 6 Sat in Amigurumi Ring = 6
Row 2: increase x 6 times = 12
Row 3: ( SBN, increase ) x 6 times = 18
Circular 4 knits behind the back walls of the loops!
Row 4-5: SBN in each loop = 18
Place a small triangle between two legs and sew it with two stitches on each side.
You should have 34 — loops on each leg and one on each side of the triangle between the legs.
Body
Continue knitting on the spiral.
Row 6: 3 SBN in one loop, increase, 15 SBN, 3 SBN in one loop, 15 SBN, increase = 40
Row 7: SBN, increase, 19 SBN, increase, 18 SBN = 42
Row 8: 12 SBN, increase, 20 SBN, increase, 8 SBN = 44
Row 9-15: SBN in each loop = 44
Row 16: 13 SBN, decrease, 20 SBN, decrease, 7 SBN = 42
Row 17: 10 SBN, decrease, 24 SBN, decrease, 4 SBN = 40
Start stuffing the body. Continue to add filler every few rows. Feet, head and body fill tightly.
Row 18: 15 SBN, decrease, 13 SBN, decrease., 8 SBN = 38
Row 19: 3 SBN, decrease, 33 SBN = 37
Row 20: 11 SBN, decrease, 17 SBN, decrease., 5 SBN = 35
Row 21: SBN in each loop = 35
Row 22: 3 SBN, decrease, 10 SBN, decrease, ( 3 SBN, decrease ) x 2 times, 8 SBN = 31
Row 23: ( 4 SBN, increase ) x 6 times, 1 SBN = 37
Row 24: SBN, increase, ( 8 SBN, increase ) x 3 times, 8 SBN = 41
Row 25: 14 SBN, increase, 9 SBN, increase, 9 SBN, increase, 6 SBN = 44
Row 26: 4 SBN, increase, 12 SBN, increase, 16 SBN, increase, 9 SBN = 47
Row 27: 23 SBN, increase, 9 SBN, increase, 13 SBN = 49
Row 28: SBN, increase, 7 SBN, increase, 39 SBN = 51
Row 29: 15 SBN, increase, 25 SBN, increase, 9 SBN = 53
Row 30: 9 SBN, increase, 24 SBN, increase, 18 SBN = 55
Row 31: 25 SBN, increase, 25 SBN, increase, 3 SBN = 57
Row 32: 6 SBN, increase, 26 SBN, increase, 23 SBN = 59
Row 33: 21 SBN, increase, 28 SBN, increase, 8 SBN = 61
Row 34: 2 SBN, increase, 58 SBN = 62
Row 35-42: SBN in each loop = 62
Cut 2 circles from the felt for the eyes. Cut a small hole in the center. Insert the pin of the safe eye into the hole and attach to the body between 37 and 38 circular rows, leaving 12 loops ( count 11 holes ) between them. Sew circles from the felt to the body with suitable threads.
Row 43: 7 SBN, decrease, ( 13 SBN, decrease. ) x 3 times, 8 SBN = 58
Row 44: ( 12 SBN, decrease ) x 4 times, SBN 2 = 54
Row 45: 3 SBN, decrease, ( 7 SBN, decrease. ) x 5 times, 4 SBN = 48
Row 46: ( 6 SBN, decrease ) x 6 times = 42
Row 47: 2 SBN, decrease, ( 5 SBN, decrease. ) x 5 times, 3 SBN = 36
Row 48: ( 4 SBN, decrease ) x 6 times = 30
Row 49: SBN, ubav., ( 3 SBN, ubav. ) x 5 times, 2 SBN = 24
Row 50: ( 2 SBN, decrease ) x 6 times = 18
Row 51: ( decrease, SBN ) x 6 times = 12
Row 52: circle decrease = 6
Cut the yarn, leaving a long ponytail and close the last loop. Pass the thread through all the remaining loops and tighten the center tight. Using the remaining ponytail, sew ears to the head.
Cut 2 ovals from felt. Dry the mouth.
Sew pieces of feltur to the body with threads suitable in color.
Spot around the eye
Row 1: 8 SBN in Amigurumi Ring = 8
Attention! Insert a safe eye into the loop and tighten the loop around it tight.
Close the last loop and hide the end of the thread on the back.
Tip:
To make your eyes more convex, add another 1 row of columns without a cape. Attach the eye to the speck around the eye, not to the head. Stuff and sew to the head.
Big fingers
Row 1: 4 SBN in Amigurumi Ring = 4
Row 2-3: SBN in each loop = 4
Cut the yarn and close the last loop.
Hands
Row 1: 6 SBN in Amigurumi Ring = 6
Row 2: ( 3 SBN in one loop x 2 times, SBN ) x 2 times = 14
Row 3-4: SBN in each loop = 14
Row 5: 3 SBN, ubav., 5 SBN, ubav., 2 SBN = 12
Right hand
Place the last finger loop next to the third hand loop and sew it. You should get only 14 loops — 11 on your hand and 3 on your finger. Continue knitting on the spiral.
Row 6: SBN, ubav., 11 SBN = 13
Row 7: 9 SBN, decrease, 2 SBN = 12
Row 8: 6 SBN, decrease, 4 SBN = 11
Tightly fill your palms. Continue to add filler every few rows. Do not fill your hands tightly.
Row 9: 3 SBN, decrease, 6 SBN = 10
Row 10: 2 SBN, decrease, 6 SBN = 9
Row 11-14: SBN in each loop = 9
Row 15: decrease, 2 SBN, flatten, tie around
Left hand
Place the last loop of your finger next to the tenth loop of your hand and sew it. You should get only 14 loops — 11 on your hand and 3 on your finger. Continue knitting on the spiral.
Row 6: 12 SBN, having fallen. = 13
Row 7: 2 SBN, decrease, 9 SBN = 12
Row 8: 4 SBN, decrease, 6 SBN = 11
Tightly fill your palms. Continue to add filler every few rows. Do not fill your hands tightly.
Row 9: 8 SBN, ubav., SBN = 10
Row 10: 8 SBN, having fallen. = 9
Row 11-14: SBN in each loop = 9
Row 15: SBN, decrease, 3 SBN, flatten, tie around the edge
Cut the yarn, leaving a long tail for sewing and close the last loop. Sew your hands to your body.
Ear
Row 1: 6 SBN in Amigurumi Ring = 6
Row 2: increase x 6 times = 12
Row 3: ( SBN, increase ) x 6 times = 18
Row 4: ( increase, 2 SBN ) x 6 times = 24
Row 5-7: SBN in each loop = 24
Row 8: ( decrease, 10 SBN ) x 2 times = 22
Row 9-10: SBN in each loop = 22
Row 11: ( decrease, 9 SBN ) x 2 times = 20
Row 12-13: SBN in every loop = 20
Row 14: ( decrease, 8 SBN ) x 2 times = 18
Row 15-16: SBN in each loop = 18
Row 17: ( decrease, 7 SBN ) x 2 times = 16
Row 18-19: SBN in each loop = 16
Row 20: ( decrease, 6 SBN ) x 2 times = 14
Row 21-22: SBN in each loop = 14
Close the last loop and hide the end of the thread. Do not fill your ears.
Split your ears. Cut pieces of felt in the shape of the ears and sew them with threads suitable in color. With the long remaining tail, sew ears to the head.
Finish collecting toys and hide all the ends of the threads. Wash the rabbit so that the stuffing is distributed evenly and give it the perfect shape. Your rabid Amigurumi rabbit is ready!
All Finished.